Pages

Saturday 28 April 2012

Shrinkie Lolly Packet Fail

This is my failed attempt at shrinking lolly packets.  The major thing for this project is to stay next to the oven and don't forget about it.  This is something I've never been good at.  Only recently have I managed to stop burning rice and biscuits.  So I will have to work on this for shrinking plastic.


Key points are: make a baking paper envelope (otherwise melted plastic sticks to tray).  Medium to low heat oven, preheated and no fan or your packets might move around a little. 

A failed experiment.  I can now advise people NOT to use sugar packets. I think Edison said something about each failure brings you closer to success?
I am not going to give up though.  Once I have managed to get some decent shrinky packets, will be thinking of what to do with them.  So the silver lining here, is that I now have more time to think of what to make and will clearly have to eat more lollies and chocolate so that I have some more packets to shrink.  Hooray!

Customised Coffee Tins

What to present home made biscuits and treats in when you're giving them as a gift?  If you're obsessed with recycling, like me, you use an old coffee tin.

Avalanche Coffee have particularly nice tins.  I spray painted them white and then painted Phin's hand which he then used as a stamp to press on the tin and lid a few times. 

A contrasting colour card with a message on it gets tied around the lid with gold thread and an old tin is made beautiful.

In retrospect, I probably wouldn't go for the red paint next time..... looks a bit like blood?  Was really meant to be Christmassy.  Could be a slight fail there.

Friday 27 April 2012

Paper Doll Fail

I was inspired to make my own paper dolls from a book I got out of the library: Collage couture : techniques for creating fashionable art by Julie Nutting.  It seemed effortless (well it is when you are just flicking through her book).

Anyway, I had the brilliant idea of making a paper doll for Haeata's birthday.  After a lot of trial and error I eventually got to the point where I could start gluing on her singlet etc.  And it took a couple of tries to cut even that near enough to right.  So by the time I'm varnishing the doll, I've pretty much had enough.  Then the varnish decides to start cracking (because I put it on too thick to try to save time).  Well that's it.  Haeata got a painting instead.  Much easier.

Luckily I didn't persevere, because one of her gifts was a very cute magnetic paper doll with magnetic clothes.  You probably know the type.  They come in various incarnations.  A friend of mine has the statue David on her fridge.

I am going to stick to buying paper dolls that come in books - and ones that have perforated edges too.  I think DIY paper dolls are really just for super keen aficionados.

DOWNLOAD FILE Here is PDF pattern for my doll.

Sunday 22 April 2012

Bottle Lid Cow Head

I was looking through one of those home and garden magazines.  I saw a great orange kitchen with the prerequisite blackboard wall.  What really caught my eye was a glimpse of a very colourful cow head.  It reminded me of those Chicago sculptures.  Anyway, this magazine happened to be the unhelpful kind that doesn't have a detailed index at the back listing all the objects in each photo.   So I scanned it to zoom in for a better look, but as you can see it is still only a scan of a tiny image.


However, google came to the rescue.  These cow heads are all over the place.  There I was thinking the head is a folded plate or something, and really it is a bottle cut up.  Cool!  See here.

So now I have to start collecting bottle lids.  We only have blue ones so I'll have to start the children on other milk instead.  I just won't tell Plunket.

Collage Foil Magnets

My cousin was the first person I saw making one of these.   I think it might have been a school project of his.  I made something very similar at school, using an old collage printing block project.  I have since changed the finish slightly.

You'll need thick/strong cardboard, textured items, tinfoil and magnet - the flat printed advertising ones are great to use.  Just rip off the advertising paper.  You'll also need PVA glue and some sort of paint / varnish / glass paint. 

Start by deciding what shape your magnet will be.  I made some fish for my boys.  Cut out the cardboard.  Then the fun part.  Children can definitely take part for this.  Think of things you can collage with that make different textures.  For the fish I used: netting from a smoked chicken, lace, foam netting from duty free bottles, buttons, string, beads, cardboard cutout shapes.  Take a look around and you'll find lots of different things you can glue.  PVA is good because it will dry flat, but if you like, a glue gun is faster drying, just lumpier.  You can also use a glue spray, but I find it sticks to my fingers too much with this type of collage and if you've got children helping PVA is the way to go.

Once fully dry (or dry enough that the textures wont slip around), cut a piece of tinfoil large enough to wrap around your magnet shape.  Cover collage with glue and gently press tinfoil over.  You are moulding the tinfoil over your collage textures.  Be careful around high contrast areas as the foil can easily rip.  Kids should be fine doing this too.  Theirs might not be perfect, but they are perfectly capable of doing this.  Glue your magnet to the back.


Give it at least an hour to dry a bit.  Now for the colour.  The easiest thing to do here is to get some glass paint and go crazy.  You can get a more painterly effect by mixing ink or dye with an acrylic varnish too.  Or paint is fine, you'll just lose the shine from your tinfoil.  When I did this at school, we used oil based printing inks in the way that you polish shoes.  I remember rubbing on a burnt sienna colour,  then buffing it off with a clean cloth.  The foil kept its shine and went a coppery colour.


Saturday 21 April 2012

Decoupage People Puzzle Blocks

I found this project in an old book about paper crafts I think.  I went with the pictures they had in the book.  It took a few goes to get the template right for it.  Quite a fiddly project, but very cute once it's finished.  I was going to give it as a gift, but it took so long I decided to keep it.  I would use more magazine colours if I was going to do it again.  (like cutting out shapes from pics of grass/trees etc for green) I used old wrapping paper too which has fun patterns.


The tower block sizes I used were: 10cm, 8cm, 6cm, 4cm.  Next time I would make them hollow (5 sided) so you could more easily store them away.  But they do take a bit of effort to make so you're going to want to display them anyway.
The blocks were from some very thick cardboard I taped together and then did a few layers of paper mache on.  I then wrapped them in dark wrapping paper I had.

The 4 characters are: Fireman, Princess, Gypsy, Clown.  Draw up your templates and trace around onto chosen papers.  Cut out and assemble before gluing onto blocks.  Once all glued on, paint at least 3 coats of varnish.  Sand lightly between coats.


Yes, there is a bird on her head.


Friday 20 April 2012

Craft Supply Storage Boxes

Another way to use up old wrapping paper.  This time pasted onto icecream containers.  These are a good size for crayons, pens, glitter, ribbon - just check out any kindy or school for proof.

Covering them in old wrapping paper is another gluey project to share with children.  They like having different boxes - makes it easy for them to differentiate containers before reading comes along.  Add a label for your memory though.

All you need to is wallpaper paste. It smooths out most wrinkly paper once dry.
Press a piece of paper over the lid to crease around the edges (like lining a baking tin).  Cut out along creases and glue.  So easy it's ridiculous.  Get a whole collection of containers  together to do in one go, otherwise your afternoon of craft entertainment will be over too soon.


Wednesday 18 April 2012

Outdoor Painted Bunting Flags

A long time ago as a sculpture student, I made 100s of cushions using calico and paint.  (It was a work about interior decoration and the practice of buying paintings to match the furniture.  The horror!)

I am someone who cannot throw anything into the rubbish without considering whether it can be reused, recycled or reimagined first.  Which has meant those cushions have been dragged around for a long time.  I have made all sorts of silly things with them, and just when I think they are now all gone, another bag of them turns up.

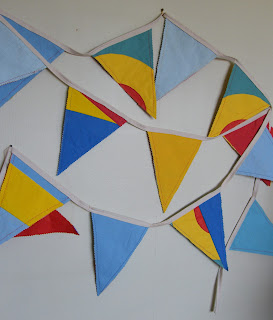
Lately I have been using them to make bunting.  They are perfect for this: the colour being painted with housepaint, doesn't fade, they are fairly rigid, and a little heavy so won't fly around too crazily, and very robust, unlikely to mould etc and can be scrubbed.  Perfect for outside (and inside too of course).

I cut out a whole heap of triangles with pinking shears.  Mine are about an 18cm base and about 25cm long.  Keep all the scraps and sew together into patchwork to make up more triangles.

outdoor painted bunting flags
You don't need to be complicated.  Just sew in straight lines. Cut any excess seam so that they aren't too bulky at the back.

Then using zigzag stitch (I just like the look of it better than straight, but up to you).  Sew one plain triangle to the back of one patchwork triangle.  Sew wrong sides together as you are not turning it out or anything.  What you sew is what you see.

Then when you have about 16 triangles at least, sew into the fold of some binding using a straight stitch this time.  Leave about a 5cm gap between each flag.  Sew alternating pattern to front, then plain.  This makes the bunting double sided so looks good from all directions.
You also want at least 15 - 20cm binding at each end to tie bunting to something.


In terms of upcycling, think of using old paint, old testpots etc.  Use acrylic.  Only one coat necessary.  Paint fabric with newspaper behind, as usually it will soak through.  Again, as you are just doing block colours, children can easily help.  If you don't want to make it a patchwork (is more work, but uses up all possible fabric so less waste) you can always paint your own patterns.  Stick some making tape down.  Use splodges and splatters.  An old toothbrush makes a great splatter brush.  I'd recommend painting outside for this as it would definitely be messy.
Use old curtains, old cushion fabric, old sheets, curtain lining, calico etc.  The paint should strengthen to a degree any slightly deteriorating fabric.


Monday 16 April 2012

Collage Frames

I had been dragging a bunch of large wooden frames I picked up from a framing studio's rubbish about 15 years ago.  They sat in the garage of each house waiting....

In the end, I decided to give them the rainbow collage treatment.  This is time consuming.  Again, a good time filler or something to do while watching TV, listening to music etc etc etc......  Not everyone can knit, but collage is easy.

So choose your colour.  I have done a neutral one for my sister-in-law with whites, and an aqua one for myself.  Cut your mosaic tiles from LOTS of old magazines.  Paste onto the frame, overlapping pieces and smoothing out with your fingers.


I have turned the frames into blackboards.  Measure the frame at the back, cut a piece of plywood or MDF to required size and paint with at least 2 coats of blackboard paint, sanding in between coats. 


This is an unfinished red one for my other sister-in-law.  As I tend to give most of the things I make away, and I tend to make things at the very last minute, I never seem to have photos of anything completely finished.  Oh well.


Sunday 15 April 2012

Rainbow Collage Blocks

This is a time consuming project, but quite good for a half-watching TV evening.  You can do this with older children (age 5+ depending on child's attention span).

You need: as many old magazines as it takes, wallpaper paste, wooden boards in whatever size you want.  It's a good way to use offcuts you might have lying around.

Choose a colour - say, RED.  Now go through your stack of magazines and cut out everything red you see.  No need to exactly cut each shape, just cut into mosaic tile shapes.    Once you think you have enough to cover the board, paste it and start sticking on your paper tiles.  Overlap them so that no board is showing through.  It's easiest to use your hands to smooth down the paper.  You can wrap them around the sides of the board too. 

If you like, you can cut out letters to spell out the colours.  You could paint the words also with a stencil if you can't be bothered finding letters in the magazines.  You could even try a 3D version and collage wooden letters before attaching them to the board.  Lots of ways to do it.

Makes a graphic sort of rainbow for children's rooms.


A Crown fit for a King

Hats for children are so easy to make and a good way to spend an afternoon.  Start out with the art and extend to dress-up playtime. 

Today we made a crown for Phin.  We used the back of an old wall calendar (the big ones that garages etc give out). 
  • Phin used his creative genius and painted a masterpiece on the paper to start with. (you could always use a previous painting to eliminate time waiting for paint to dry)
  • Then I cut out triangles at the top to create a zigzag pattern with pinking shears.  This makes the top of the crown.
  • The crown really got spectacular once we got out the ribbons and trim I save from gift wrapped presents.  I cut little bits of ribbon and curled them, then attached bits of tape so that Phin could stick them onto the hat.  

The main thing to remember when you are crafting with children (apart from safety of course) is that you let them do their own thing.  So what if the composition is uneven and there are wonky bits or clumps of ribbon in one spot and nowhere else.  It's not your crown, it's the King's!

When no more embellishments could possibly fit, or attention is wandering, wrap the hat around child's head to fit and tape. 

Your majesty!

Saturday 14 April 2012

Applique Onesie with Cookie Cutter Shapes

The title here says it all: Applique Onesie with Cookie Cutter Shapes

I had some space themed cookie cutter shapes and a plain onesie that I thought could be livened up a little.  (It's also a great way to cover stains that might occur).

Trace cookie cutter shapes onto felt.  Cut out and blanket stitch onto garment with contrasting thread.  I used embroidery thread as it's thicker and so stands out more.

The end.

Tuesday 10 April 2012

Painting with Kids

Our craft afternoons do get messy.  Since we're currently renovating our house (slowly) I can handle a bit of wear and tear.  I have had people ask what to do about painting with children as they are hesitant to let kids loose with paint at their places.  There's always a way.

Firstly, if you use child friendly poster paints you'll usually find it washes out eventually.  Also art shirts are a good idea.  Ikea have some good long sleeved overshirts.  You can put plastic down on the floor too.  Or if it's sunny go outside to paint.  Sponges are good for littlies, big brushes and spill-proof pots are also very helpful - one brush per colour works.  I also collect polystyrene containers - like the ones avocados come in.  They are good for putting dollops of paint in for sponges and stamps.

I know a lot of people avoid glitter because it gets EVERYWHERE.  That is true.  I like the left over sparkle look though.  It's a bit of artistic magic left behind.  A sprinkle of glitter sticks to wet paint and will bring out the shine in even the muddiest mixed up brown painting.

Monday 9 April 2012

Pixelated Art

I have been obessed with pixelated images for years.  One of my end of year projects when I was studying sculpture was a huge (massive really - about 2 storeys high approx) pixelated mills & boon quilt.  I think it still remains one of my favourite things I ever made.  Will have to find the images of it. 

Anyway, I came across the website of a company called ixxi, who I think do the coolest pixellated images.  I immediately fell in love with The Girl in the Pearl Earring as a pixellated image.  So I photoshopped my own version and went to the local photo printer to print 200 or so individual block colour 6x4 prints (with the intention to cut down to 4x4). 

Only problem is, I realised I don't have anywhere to put it as the image will be about 1.3 x 2 metres high.  Still thinking what to do about that.  New house?  New furniture?

Sunday 8 April 2012

Papier Mache & Paper Pulp Skittles

Today is Easter.  We have made chocolate eggs, but I'm leaving that for Briar to record.  I instead will reveal the secrets behind making skittles.  They are once again a recycling project, using plastic soda bottles, old newspapers, wallpaper paste and leftover acrylic test paint pots.

Firstly tear a lot of newspaper into strips,and put two thirds of it into a bucket and soak in hot water with a little wallpaper paste.

Dip the rest of the strips into paste and smooth over the plastic bottle until bottle is completely covered in at least one layer of paper.

Meanwhile the strips in the bucket should have soaked long enough by now.  Put small batches in a blender together with lots of water (enough water so the blades can still spin easily). Tip each batch into a new bucket or large bowl until all strips have been pulped.  Then strain excess water through a sieve.  Again do this in handful sized batches to keep it manageable.  Once you have drained most of the water add a little more wallpaper paste and you now have mouldable paper pulp. This paper pulp process is lots of fun for kids to help out with.  It's lovely and messy.  You can give them a bit at the end to mould for themselves. 

Mould pulp directly on the papier mache into whatever shapes or patterns you choose.  Mould some into a ball shape and press onto the top of the bottle.  Make sure the ball tucks completely around the lip of the bottle.  When it dries, it will contract and be completely stuck on.

Leave enough pulp at the end to roll into a ball.  The ball needs to be big enough that it can't be swallowed by babies, but small enough to fit in children's hands.  And leave it all to dry.  Drying is in terms of days not hours. 

My helter-skelter skittle

Once completely dry, paint with your leftover test pot paint.  This should mean paint is fairly durable.  Again, as you are painting the whole thing, you can easily include a pint sized assistant in the process.  Any embellishments you can do yourself, depending on what level of finish you're after.  Don't forget though that these are children's toys and small children at that.  The skittles are going to get the bash.  Put your painted masterpieces on the wall instead.

I think they look quite decadent with the gold.  I really like the lumpy sort of  texture that you get once paper pulp has dried.  However, if you don't it is easily sanded.  (I say easily, but I hate sanding).

I gave a set of three skittles to my gorgeous godson Elliot.  I hope he's enjoyed them.  I think Elias got some too.  I still haven't got around to making any for my boys.  My attention wanders too quickly onto new ideas.

Saturday 7 April 2012

Wallpaper Bunting

For my mum's 60th birthday picnic I bought a cheap gazebo. Using some of my wallpaper sample books I then made some lovely wallpaper bunting to make it slightly more festive.  Token effort, but cute, and being wallpaper it lives on to liven up another party.

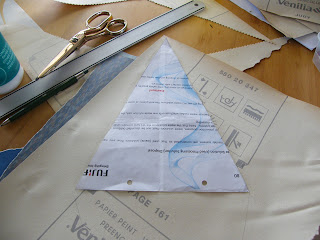
Cut out your triangle template and if you are clever, you will double it up to become a diamond.  If you are like me and like to save time so that your project takes twice as long to do, stick with the triangle....


So you need a piece of wallpaper big enough to fit a diamond (two triangles end to end).  Easier to have the diamond in one piece because you then fold it in half ready to hang over a cord and wallpaper/cellulose paste together.

....and the pictures ended up sideways.  How did that happen?  Well they can stay that way.  Cool vertical grass wall.

Friday 6 April 2012

Play Kitchen

I've been thinking about making a play kitchen for the boys and it would be great for entertaining all the children when we meet for crafternoons.  I found this great one at Craftster and think it could be doable. I love the fact that it uses an old computer desk.  It seems like people are always throwing these away - maybe because they buy them so cheaply.  They're not the most attractive pieces of furniture.
I think I'd try to find a very small desk though.

Thursday 5 April 2012

Quick and Easy Downsizing a Bedspread

I was offered a double bedspread set and in the end really didn't need it.  However, Phin needed a single bedspread now that he is out of the cot.... so I sewed and overlocked the edges after.  A double is approx 200x200cm.  A single is about 135cm across.  I took off 65cm.  Very easy, but make sure you pin bedspread together and chalk the line as it is a lot of fabric and can be a little unwieldy.

As it was very plain and I have so many random bits of fabric, I found a tiger print fabric I had and ironed a double fold under and sewed a band across the bottom of the bedspread.  I ended up having to join two pieces together.  Not perfect, but as far as small boys are concerned, tigers are just really cool and they couldn't care less about seams. 
 

A small square of fabric was left over, so I just sewed it onto a pillowcase.  I sewed it to the far right as Phin can then turn his head and see the tiger.  He thinks that is awesome, but if you think too scary (?!), maybe put it in the middle.  Or don't choose tigers.  Fluffy bunnies or something.


Ignore walls and carpet.  I have plans for jungle themed bedroom, but sadly the boys have to wait until we finish other rooms first.

Wednesday 4 April 2012

Fabric Covered Coat-Hangers

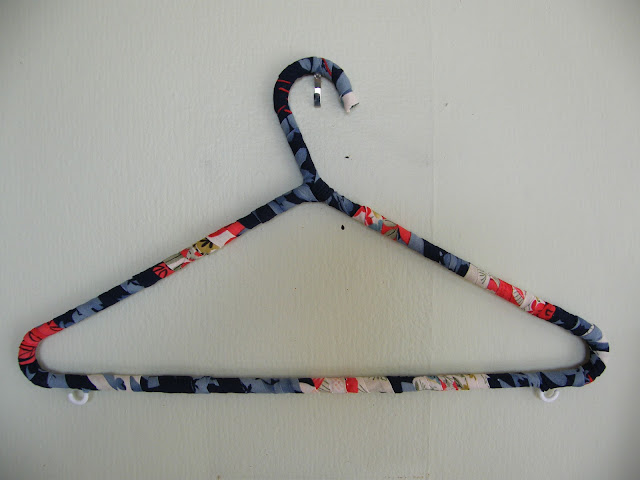
Mitsuyo started this really, but after I had finished covering my shoeboxes, I had some leftover strips of fabric that I was going to throw away.  I suddenly remembered Mitsuyo cutting strips of fabric and wrapping them around a plastic coathanger.

fabric covered coat hangers


All you need is some double-sided tape, and some fabric scraps. 
Cut a section of tape.  Unpeel one side of the tape and stick down onto hanger.  Then gradually peel back the top layer of tape and begin sticking on fabric.  You need to fold under one edge of the fabric and start at top of hook.

You only need to fold under one edge of the fabric (because this is the edge that is edge that is visible on top).  The raw edge gradually gets covered as you wrap it around.  I recommend you try it out before sticking on tape if you need to visualise it..  It's very easy though.

I was going to put my hanger in the boys' wardrobe, but realised how great it is at holding cardigans etc, which usually slip off plastic coathangers.  So I'm keeping it. Mitsuyo cut off the little hooks at the bottom of the hanger, but I decided to keep them as they can be useful.  I just had a little hassle wrapping around them.

fabric covered coat hanger

Such a good way to use up fabric scraps.  Brilliant

Tuesday 3 April 2012

Silhouette Cameo

I clicked on 'next blog' and got one where this lady was talking about Silhouette Cameo for making signs.  Wow; it is a digital cutting tool for home use.  I want one! 
http://silhouetteamerica.com/silhouetteCameo.aspx
Can I justify the expense and space it would take up though?  I am trying to declutter.  Hmmm will have to keep up with the new year resolution in the meantime....

Monday 2 April 2012

Fabric Wrapped Boxes

One of my new year resolutions was to reduce clutter.  I decided that I have to use all the fabric I currently have (except for any specific immediate projects). No more stockpiling or hoarding.  I also need to organise my current clutter and knick-knack keepsakes that for whatever reason I find impossible to get rid of.  Therefore when my sister-in-law had a pile of shoe boxes to throw out I reneged on my resolution.  However, it was all part of the master plan in a roundabout way.  And so is this introduction.

I chose two shoe boxes to stack.  One slightly smaller to stack on top. 

Paint out any text that might show through the fabric.
Very badly trimmed excess.  I ended up finishing the edges with masking tape.  It's the inside.  No one is going to notice, unless you're making it as a gift and then I suppose you could line inside with fabric too.
I put box on my chosen fabric and cut enough of an allowance around it to go up the sides and a bit over the edge (just as if you are gift wrapping something).  I used spray adhesive on the box and wrapped fabric around box.  Trim excess inside and then tape down edges to neaten.

Same goes for the lid.  Maybe try lid first as it's smaller and a bit easier as sides are shorter. Also remember that the added thickness of fabric over the box will make the lid a much tighter fit.  So choose boxes with a generous lid.  If it's already tight fitting it will be too tight.

I only used two boxes because that's all I had enough fabric for.  I have a third smaller box, and just need to choose maybe a plain red or blue fabric to complete the set.

My lovely Japanese fabric that was too annoying to sew into clothing was perfect for covering a box.  Now I get to admire it all the time and my dressing table clutter can disappear.


Sunday 1 April 2012

Gift Wrap Art Poster

After a birthday party, this wrapping paper with a car and truck pattern was too good to waste.
I found a thick piece of cardboard and spread wallpaper paste all over it.  Phin had a brush also.
We stuck the wrapping paper on and I smoothed it out as he is a bit more haphazard.
I then gave him some car stickers to complete the picture.
He loved making it and still asks me to pull it down from the shelf to admire it.

Framed Wallpaper

 I was invited to my step-niece's 21st birthday.  It was a girls-only party with a high tea theme.  She even borrowed her great-grandmothers teacup sets for the occasion.  It was a really lovely afternoon and evening with her gorgeous friends and all the women in her family.  I decided to make her a framed picture of a tea cup using wallpaper.  I attached the pieces by sewing them together.   And it was for all the guests to sign the back of it.  (Much like people do with those wooden 21st keys, but a more dainty version).  I used a sheet of acetate to protect the wallpaper instead of glass, but next time think I will skip any protection altogether.  Wallpaper is designed to be durable after all.

Here are some versions I have done for myself and another friend, but just using one piece of wallpaper as the patterns are detailed enough to admire for themselves.
Wallpaper I bought from a garage sale. 


Wallpaper from a roll we found in a cupboard when we moved in to our house.

Wallpaper from a sample book.
All these wallpaper frames are upcycled obects.  I have used old frames that we no longer use or ones from charity shops and I spray paint them white.  Same goes for all the wallpaper.  I recommend going to local paint shops and seeing if they have any old sample books lying around.  The papers in those will keep you going for years.  I got 5 sample books about 15 years ago and am still using them for projects.  Some of the patterns have come back into fashion now!