Pages

Showing posts with label sewing. Show all posts

Thursday, 6 December 2012

Fabric Tree Stack Wandering

Spot the tree
I gave the best made tree (of the two I've completed so far) to my craft buddy Suzy at our end of year secret Santa (ok not so secret) gift exchange.  Mr Mover moved in and lived on the shelf above for a while.  See if you can spot him.

Today I got this message:
Someone is on an adventure! This is where I found the tree 
this morning. Suz


He reminds me of those travelling gnomes.  But he seems to be hanging around for now.

How to make can be found in my previous post Fabric Tree Stack Christmas Decorations.

Monday, 3 December 2012

Fabric Tree Stack Christmas Decorations

I was going to make some trees to fit in baby jars, but on closer inspection decided that baby jars really are tiny.  Sewing tiny things is not a sewing machine kind of thing.  (which is why I think paying grown-up prices for children's clothing is completely fair.  Imagine how tricky some of that sewing is on a miniature scale).  Umm...

Ok.
This is the tutorial I followed: The Small Object Archive.
I decided not to use a glue gun as I was having a misguided 'no toxic chemicals' moment.  Glue gun would work great though.  I, however, used a needle and thimble to sew through the tips of all the tree stack a few times, then knotted to fix.

However I wanted to add a bit of bling, and also have them hanging on the tree.  So this is what I did:

  1. I  took some bead strands and sewed at a few points around the tree.  
  2. I then sewed through the middle of each stack with some gold thread and did not pull thread tight, but left a big loop which I then knotted together at the tip of the tree both on the inside and outside.
Perfect way to use offcuts of old fabric.

Voila! Very cute christmas tree decorations.

Monday, 12 November 2012

Preschooler Teepee

This is super clever.  Olivia was going to give it away?! But as it took two intense weekends to make (plus all the materials) she has decided to keep it at her place for small visitors to play with.

This super cute teepee was made by the lovely Olivia.
It was based on a Your Home and Garden pattern, with a few Mocka inspired tweaks in the pattern to make it even better (and work with the fabric widths - 120cm instead of 150cm) .  The dowels have beads and elastic threaded through at the top so the whole thing folds away easily.

Sunday, 19 August 2012

One Way to Use Old Books

Found this site today: Upon a Fold.
Of course the page I happened upon was from years ago - the Holland Paper Biennial in fact.

Holland Paper Biennial
Anouk Kruithof
What an awesome way to use old books.  Would need to have a lot of patience to collect them.  Maybe you could just stain the pages at one end of a book.  Round up all the leftover from a book or school fair.  They just get sent to the tip otherwise.

Tuesday, 5 June 2012

Pixelation and an Ode to All Things Square

I am in love with squares.  I love square paintings, frames, rubics cubes, square bedside tables, Charles Rennie Mackintosh (that's because I also love Art Nouveau and he made it more square), patchwork quilts (not ones with diamonds, or triangles - only squares), and pixels. 

The greatest things about photoshop is that you can pixelate an image into squares of any size you choose.  I have mentioned ixxi before and still have my version of Girl With a Pearl Earring to finish off for the hallway (but like everything else in my house still needs wall stripped of old wallpaper, replastered, sanded and painted.....hours of boring work).


There are also all sorts of programs I'm sure, for breaking down images into squares because that must be how they do it for cross stitch....  like KG Chart which apparently is free.  


The main thing to remember when pixelating something is the scale.  Say you are making a cot blanket - the dimensions are approx 110 x 130cm.  So if you are making each square 10cm, you can only have 13 squares by 11 squares. It would need to be a very simple image.  If you decide to go with 5cm squares, you have more to play with, but also twice the work.  It would be better to go with 7.5 cm which would mean 105cm x 127.5cm quilt, with 14 squares by 17 squares (but you can adjust to 15 x 18 squares) 


In Photoshop: go to Filter - Pixelate - Mosaic.  You can adjust the pixel size.  130 is about the limit for an image - so you can just tell what it is meant to be.  It is getting quite abstract though.

pixelated bunny rabbit
 
And then use the crop tool to crop the image to the number of squares the project will be.
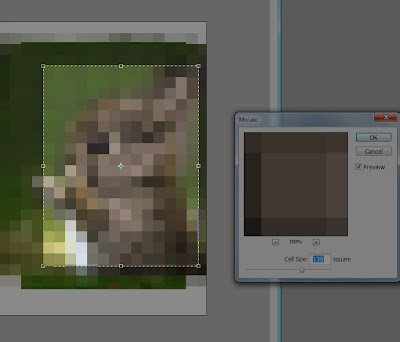
pixelated bunny rabbit
This is about 14 x 18 squares I think.

Finally you need to find lots of scraps of fabric that are approximately the right colours.  If you went for something like this rabbit, it will eventually be difficult to see what the image is meant to be, but you'll have a lovely quilt in a neutral palette of browns and greens.  Way stylier than pink or blue.
The simpler the image, and fewer colours, the easier it is.  Easier is sometimes good, but not usually as interesting.