Pages

Thursday, 24 May 2012

Printing on Wallpaper

I've had 3 wallpaper sample books for about 10 years now.  They are huge and have hundreds of pages.  I really want to go get some new ones, but get into trouble when the garage starts looking like a hoarder's haven.  So need to use them up and soon! 

My latest idea was to make thank you cards with them.  I have discovered that if you have a laser printer, it will print on the vinyl perfectly.  I only had a black and white printer, which works fine for me.  Too much colour would compete with the patterns on the paper.  Best to keep it simple.

So cut your paper into A4 sheets.  Set up a template and print.

I found this to be great for thank you cards also as it saved time for me.  No gluing buttons, cutting out intricate flowers or any other crazy stuff I've done in the past.  I do like sending thank you cards, but sometimes I get halfway through and wish I hadn't started.  (Out of a previous lot of cards, only half a dozen were actually finished and posted out - sorry everyone else....)


Wednesday, 23 May 2012

Latest Pink Owl Bunting

Owl Bunting Upcycled & Vintage Fabrics
$45.00
Owl Bunting - Vintage and Upcycled Fabrics - Pink
$45.00
 I have just made and listed some pink owls on felt.  So cute.


Plastic Jam Pot Uses

My favourite jam is from Anathoth.  Not only is their jam delicious, but when I bought my 3 Berry Jam the other day, I noticed a new label on the lid.

I love that it is reminding people to re-use their plastic pots.  It highlights the fact that they are also microwavable, freezer safe and BPA free.
PLUS it list some ideas for using the pots for other things such as raising seedlings, children's crafts, a pen holder or even something to tidy screws and nails.
I have always reused my jam pots - the seal is fantastic and the plastic doesn't seem to wear out the way other food pots do.  So cool to see companies thinking of stuff like this.  I know people go on about greenwashing, but surely even just promoting green thinking is a good start for people who might not even consider it otherwise.

Saturday, 19 May 2012

Painting with Cars

This is an idea I got from Phin's daycare teacher.  She was trying to engage him in painting by combining it with his number one passion: cars. 
All you need for this one is some paint, brushes, paper and toy cars with different wheel textures. 
If you're using child friendly poster paint it will wash off the cars easily with water.
I used my trusty wallpaper sample book to get some grey textured paper for a 'road' look.  (If using vinyl wallpaper and paint gets too thick, poster paint will flake off a bit once dry).

Techniques:
  • Dollop of paint in a tray and roll car through then drive it on the paper.
  • Paint using brush directly onto tyres then drive it on the paper.
  • Paint directly onto paper then roll cars through spreading paint around.

Painting onto paper before rolling car through.


One finished work showing true artistic genius!
The artist is likely to get sidetracked and start painting cars and generally playing more than painting, but that is the goal.  This is great for getting a car mad, paint averse child into art.
Like a true off roader.  Only the mud puddle is a weird yellow colour.

Tuesday, 15 May 2012

Wedding Pew Bows

My gorgeous sister just got married so it has been a crazy few weeks.  She loves bright colours, so we were commissioned to make bows for the pews.  My mum googled and found one that she thought we could have a go at.  It involves tulle, ribbon, beads and silk flowers - although we found some lovely foam roses at Spotlight which we ended up using.  The church is an old wooden one - very dark interior and richly coloured stained glass windows, so the red Michelle chose worked really well I think.


We were just going to use wire to tie it all together, which was fine for the tulle part, but my aunt came around to help tie bows (not my strongest point - it is very difficult to tie a symmetrical bow I discovered) and she had us all hand stitching the ribbon, beads and roses to the top.  Sounds difficult, but actually very simple and quick.  We had it done in a few hours. 


Top tip: Get a few people over to help for stuff like this.  It's more sociable and you can get a production line going with each person doing the part they are best at.  Maybe break out the bubbles after you've finished though.

Monday, 7 May 2012

Ultimate Baby Wrap

I was given a lovely merino baby wrap.  It is the best wrap I have ever used.  So of course I had to copy it and amend slightly to improve it...

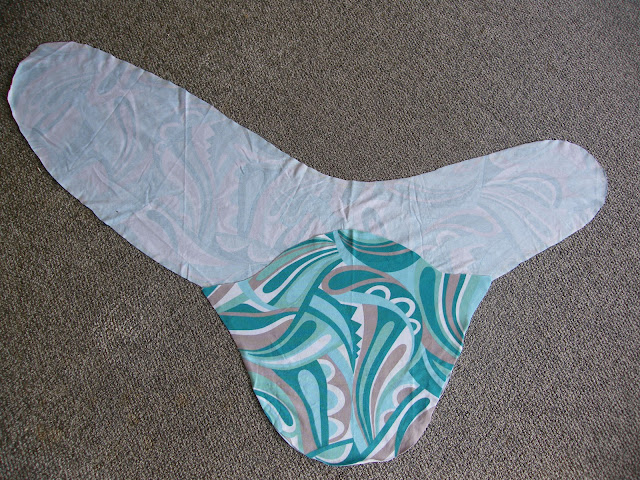
The short arm just needs to be long enough to come over front of baby.  It's the left flap that needs to be super long so that you can get it all the way around.  Keeps new born totally snug because of the pocket.  No feet coming out and no escaping.
My improvements were: lots of pattern and colour.  I am over the pale blue/pale pink range that blankets seem to come in.  Also as my second baby was a summer boy, I made it in a stretch cotton instead.  I have also gradually made the long wing as long as material allows.  Good to buy extra wide bolt of cloth.  120cm+ is good.

You don't need a pattern.  Make it as long as baby is from toe to chin.  So 40cm from bottom to top or thereabouts.  And one wing needs to be long enough to go all the way around baby.  They're angled so they come under chin easily.  Pocket is just cut to match back.

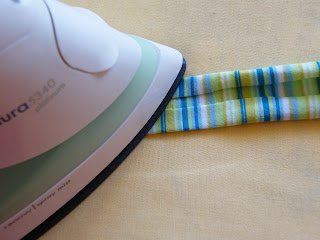
I make my own binding too.  Cut 5cm strips.  Sew ends together until you have about 4m length.  Fold under two sides to almost meet in middle.  Iron as you go.

Sew a length of binding on the front pocket first.  I always pin first.  Used to not bother but it never saved me time and caused all sorts of mayhem.

Next pin pocket onto wrap.  (wrong sides together - what you see is what you sew).  Then sew binding all the way around.  As you near the end, tuck ends underneath themselves and sew over. 

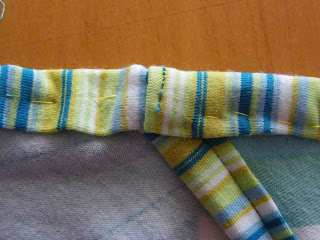
In this case, I sewed the end so it didn't come untucked and also basted the binding rather than pin.  The fabric at this point gets a bit bulky and pins tend to get in the way.
Now for wrapping instructions:


Should be easy to follow from pics, but send a message if you have a problem.

I have made LOTS of these.  They are very good.

Wednesday, 2 May 2012

Owl Bunting

Ok so I've finally got a few pieces finished and have listed them over on felt.co.nz/shop/zandieroom

owl bunting
So far it's only my sets of owl bunting.  I do like them.  Who needs flags?